
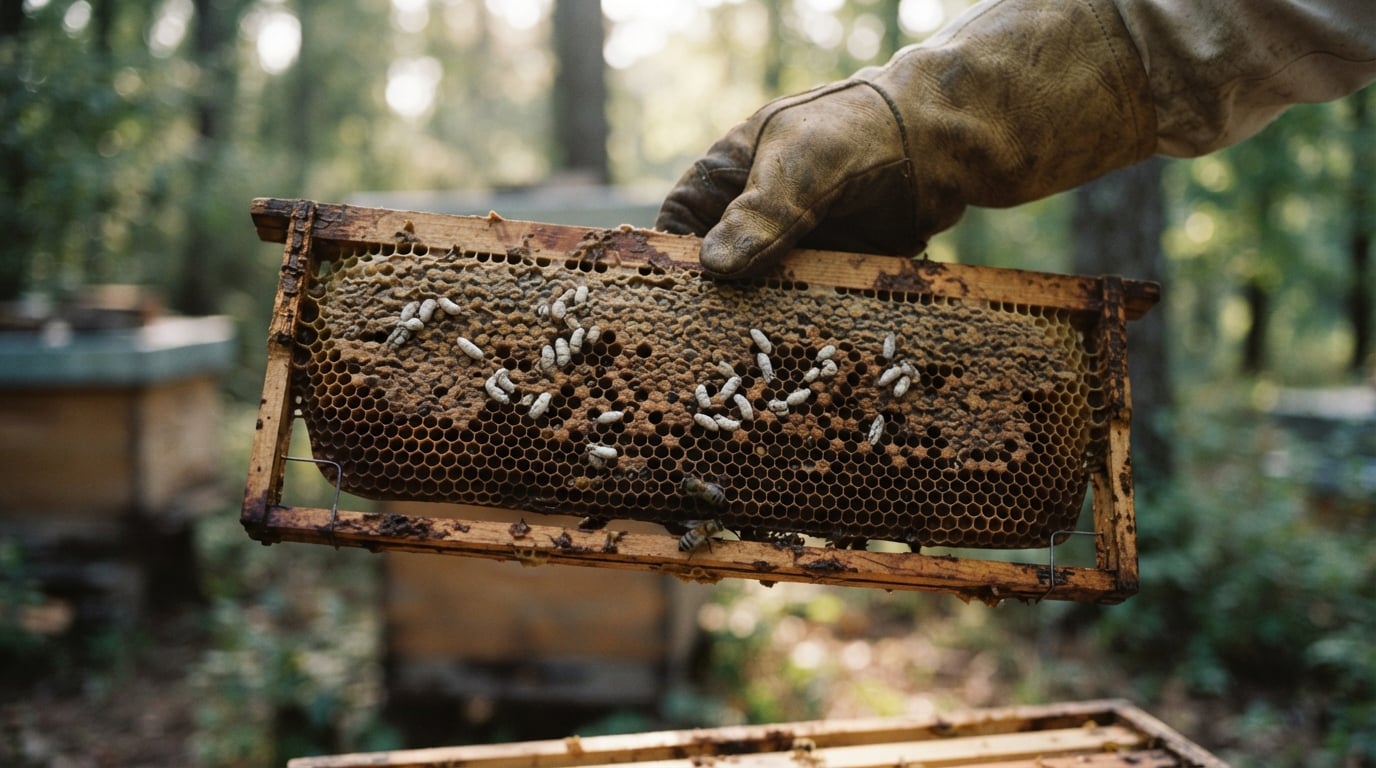
I crouched beside a hive last April and saw white pellets scattered across the landing board. At first I thought they were grains of sugar, but a closer look told a different story. Those were chalkbrood mummies, and the colony inside had been quietly losing ground for weeks. That scene is what pushed me to write this guide, because chalkbrood is one of those conditions that often surprises new beekeepers and frustrates experienced ones.
Chalkbrood is a fungal brood disease that turns honey bee larvae into hard, chalk-like pellets. It rarely wipes out a colony outright, but it weakens populations, depresses honey yields, and signals that something in your management is off. In this guide, I will walk you through the conditions that cause chalkbrood, the symptoms to look for, and the management steps our team has used across dozens of apiaries. You will also find a side-by-side comparison with sacbrood and foulbrood, plus a natural treatment checklist you can apply this season.
By the end, you should be able to diagnose chalkbrood with confidence, choose the right management response, and prevent it from coming back in 2026 and beyond.
Table of Contents
What Is Chalkbrood and Why Should Beekeepers Care?
Chalkbrood is a fungal infection of honey bee larvae caused by the pathogen Ascosphaera apis. The fungus enters larvae through contaminated brood food, then grows inside the body until the larva dies and mummifies into a hard, chalky pellet. Those mummies are the calling card of this disease, and they are usually the first thing a beekeeper notices.
The pathogen itself is a specialist. Ascosphaera apis spores can survive in beekeeping equipment, soil, and old comb for years, which is why chalkbrood can reappear in a yard even after a colony has been treated. The good news is that chalkbrood alone rarely kills a strong colony. The bad news is that it chips away at brood production, slows spring buildup, and can lower your honey crop by 15 to 30 percent in heavy outbreak years.
What makes chalkbrood worth attention is what it tells you about the colony. Outbreaks almost always coincide with some form of stress, whether environmental (dampness, cold snaps) or biological (a failing queen, poor hygienic genetics, weak population). Treating chalkbrood without addressing the underlying stress is like mopping the floor while the sink is still overflowing. We will come back to that point several times in this guide.
The mummification process in plain terms
Here is the short version of how chalkbrood develops inside a larva:
- Day 1 to 3: A larva under three days old swallows Ascosphaera apis spores along with its food.
- Day 4 to 6: The fungus germinates in the gut, then pushes fungal threads (mycelium) through the body.
- Day 7 to 8: The larva dies, loses its normal segmented shape, and hardens.
- Day 8 onward: The body dries into a chalky white or grayish pellet, sometimes darkening to black as the fungus produces spores.
House bees then remove many of these mummies from the cells, which is why you find them on the landing board, the bottom board, or the ground in front of the hive. The pellets are roughly the size of a grain of rice and feel hard when you pinch them. That chalky texture is the single most useful diagnostic clue you have in the field.
Signs and Symptoms of Chalkbrood in Your Colony
Chalkbrood is a visual disease. Once you have seen a few cases, you can spot it in under a minute during a frame inspection. The challenge is that early signs are subtle, and chalkbrood can look like other brood diseases if you are not paying attention. Here is what I look for, and what our team trains new beekeepers to look for.
The three color stages of mummies
Mummies change color as the fungus develops, and each stage tells you something about how long the infection has been active.
- White mummies: Freshly killed larvae. The fungus is still actively growing. You will see these most often during an active outbreak.
- Gray or greenish mummies: The fungus is producing fruiting bodies but spores have not yet matured. This is the most contagious stage.
- Black mummies: Spores are mature and infectious. These can survive for years on equipment and are the main reason for thorough comb rotation.
If you see mostly white mummies, the outbreak is active right now. If you see mostly black mummies, you may be looking at leftover infection from a previous season. Both situations call for action, but the response is different.
Where to look on the frame
Chalkbrood shows up in capped and uncapped cells, and the scattered pattern is one of its most recognizable features. Look for:
- Cells with cappings that appear sunken, punctured, or partially removed.
- White or gray pellets visible at the cell opening, sometimes still partially inside.
- A patchy brood pattern with healthy larvae next to mummies.
- Mummies on the bottom board, on the landing board, or in the debris tray.
Healthy brood, in contrast, shows a tight pattern of pearly white larvae curled in the bottom of each cell, with uniform tan cappings over sealed brood. If your brood pattern looks spotty and you see chunks of cells with missing cappings, chalkbrood is high on the list of suspects.
How fast chalkbrood spreads inside a hive
In our apiaries, a small outbreak can turn into a full-blown case within 2 to 3 weeks if conditions stay wet or cold. A handful of mummies on the landing board today can be 200 mummies per frame three weeks from now. That is why we recommend checking the bottom board weekly during spring and fall, when temperature swings are most stressful on brood.
One more clue worth noting: chalkbrood mummies do not rope out when you poke them with a toothpick. This is a key difference from American foulbrood, which is one of the two most worrisome diseases in honey bees. If your mummies stay solid and chalky, you are almost certainly dealing with chalkbrood. If they stretch into a brown, sticky string, you have a more serious problem and should contact your local apiary inspector.
Conditions That Cause Chalkbrood Outbreaks
Chalkbrood needs three things to take hold: spores in the environment, a susceptible larva, and a stressor that tips the colony over the edge. Understanding which stressor is at play in your apiary is the single biggest factor in whether your treatment works the first time.
Dampness and poor ventilation
High humidity inside the hive is the most common trigger our team has documented. Ascosphaera apis spores germinate best when relative humidity inside the brood nest stays above 70 percent for extended periods. When the air is damp, larvae cannot regulate their body moisture well, and the bee’s immune defenses slow down.
You will see chalkbrood show up most often in:
- Hives in low-lying apiaries where fog pools in the morning.
- Colonies with too much insulation packed around the brood box in winter.
- Hives with screened bottom boards left open during cold, wet weather.
- Locations with poor air drainage, such as the bottom of a slope or under dense tree cover.
If your chalkbrood cases cluster in specific yards, humidity is almost always the culprit. We have seen entire apiaries clear up within a single season after moving hives 30 feet up a slope or opening upper ventilation.
Chilled brood
Chilled brood is the second major trigger, and it is the one most often mentioned on beekeeping forums. When the brood nest drops below about 33°C (91°F) for several hours, larvae become stressed and their immune response weakens. The spores that adult bees normally carry harmlessly become a problem because the larvae can no longer fight them off.
Chilled brood happens when:
- A colony is too small to cover all the brood during a cold snap.
- You split a hive too early in spring and the new nuc cannot keep the brood warm.
- Beekeepers open hives for long inspections in cold weather.
- A queen lays a wide brood pattern that the cluster cannot cover late in the season.
Our team has measured cluster temperatures in early spring nucs and found that even a 90-minute inspection on a 12°C day can drop the brood nest by 4 to 5°C. That is enough to trigger a chalkbrood bloom two weeks later.
Colony stress and weak populations
Beyond humidity and temperature, any factor that stresses the colony makes chalkbrood worse. Common offenders include:
- Poor nutrition, especially during late winter and early spring dearth.
- Varroa mite loads above 3 mites per 100 bees.
- Failing or old queens with reduced laying patterns.
- Aggressive or robbing events that disrupt the colony rhythm.
- Pesticide exposure, even at sub-lethal doses.
If a colony is already dealing with two or three of these stressors, chalkbrood tends to take off. Strong, well-fed colonies with low mite counts can carry low spore loads indefinitely and never show symptoms.
Hygienic behavior and genetics
Some bee lines are simply better at detecting and removing infected larvae before the mummies form. This trait, called hygienic behavior, is partly genetic and partly learned. Hygienic bees uncap diseased cells and haul out the larvae before the fungus can sporulate, which stops the outbreak in its tracks.
Several commercially available stocks show strong hygienic behavior, including VSH (Varroa Sensitive Hygiene) lines and certain Carniolan and Buckfast crosses. If your chalkbrood cases keep returning year after year despite good management, switching to a more hygienic queen is often the most effective long-term fix.
How to Treat Chalkbrood in Honey Bee Colonies
There is no chemical cure for chalkbrood. Antibiotics do not work because the pathogen is a fungus, not a bacterium. The treatment plan is built around three pillars: remove the stressor, support the colony, and remove the spores wherever practical. Below is the step-by-step process we use in our own apiaries.
Step 1: Improve ventilation and reduce humidity
This is the single highest-impact action you can take. Within a week of improving airflow, our team has seen mummy counts drop by 50 percent or more. Practical steps include:
- Crack the inner cover or add a ventilated inner cover to allow moist air out.
- Add a thin shim or upper entrance above the brood box for warm air escape.
- Tip the hive slightly forward so water drains out of the bottom board.
- Move hives out of frost pockets and into morning sun where possible.
- Avoid wrapping hives in plastic or insulation that traps moisture.
For winter, our team uses a quilt box filled with wood shavings above the inner cover. It absorbs moisture before it can drip back down onto the cluster, and we have seen fewer chalkbrood cases in wrapped hives that use one compared to those that do not.
Step 2: Remove mummies and clean equipment
Active mummy removal helps lower the spore load in the hive. During inspections, scrape bottom boards clean and reduce entrance blocked by dead bees. If you spot heavy mummy buildup on a particular frame, consider moving that frame to the outside of the box or removing it entirely so the bees can clean it out.
For heavily infected colonies, our team has had success with these additional steps:
- Replace heavily contaminated frames with fresh foundation or drawn comb.
- Sterilize reused hive boxes with a scorch torch or dilute bleach if the infection is severe.
- Avoid swapping equipment between healthy and infected hives.
Step 3: Decide whether to requeen
Requeening is the right call when the colony has chronic chalkbrood that returns every spring, the queen is more than two years old, or the brood pattern is patchy for any reason. A young, vigorous queen from hygienic stock will lay a tighter pattern and the colony will scale up faster, both of which help the bees outpace the fungus.
Our team generally requeens when any of these are true:
- Chalkbrood has been visible for more than two consecutive seasons.
- The queen is in her second year or older.
- Brood pattern is shot-gun and the queen is producing small or misshapen larvae.
- The colony shows other signs of decline, such as slow spring buildup or defensive behavior.
If the queen is in her first year and the outbreak is mild, our team usually waits one full cycle before requeening. Improving ventilation and removing the worst frames often clears the issue without the cost and disruption of a new queen.
Step 4: Feed and support the colony
Stressed colonies need fuel to rebuild. A 1:1 sugar syrup in spring gives the bees quick energy to draw new comb and ramp up brood production. Pollen substitute patties help in early spring when natural pollen is scarce.
Adding a frame of capped brood from a healthy donor hive is one of the most reliable recovery tactics we have used. The boost in emerging bees raises the cluster’s heat production and improves hygienic behavior. Just be sure the donor hive is genuinely healthy, not an asymptomatic carrier of chalkbrood.
Step 5: Natural options that beekeepers use
Several natural remedies circulate on beekeeping forums, and our team has tested a few of them. The most commonly cited options include:
- Banana peel placed on the top bars: Beekeepers report that bees chew on the peel and may discard mummies. Anecdotal evidence is strong, but controlled studies are limited.
- Essential oil treatments (thyme, lemongrass): Some beekeepers add a few drops to sugar syrup. Studies are mixed, and oils can affect queen laying if overdosed.
- Re-queening with hygienic stock: This is the natural approach with the strongest evidence base.
- Comb rotation and hive sterilization: Removes the spore reservoir without chemicals.
Approach quick-fix remedies with a healthy dose of skepticism. The most reliable natural treatment is still the combination of ventilation, mummy removal, and requeening with hygienic stock.
Chalkbrood vs other brood diseases
Getting the diagnosis right is critical, because the response to chalkbrood is very different from the response to other brood diseases. The table below summarizes how to tell them apart in the field.
| Disease | Cause | Symptoms | Treatment | Notifiable |
|---|---|---|---|---|
| Chalkbrood | Fungus (Ascosphaera apis) | Hard white, gray, or black mummies | Ventilation, mummy removal, requeening | No |
| Sacbrood | Virus (SBV) | Brown, watery larvae in fluid-filled sacs | Supportive care, requeening if persistent | No |
| American foulbrood | Bacterium (Paenibacillus larvae) | Brown, sticky larvae that rope out | Burn infected equipment, contact inspector | Yes |
| European foulbrood | Bacterium (Melissococcus plutonius) | Twisted, yellow larvae, sour smell | Improve nutrition, requeening, oxytetracycline in some regions | Varies by country |
If you suspect American foulbrood, stop your inspection and contact your local apiary inspector immediately. Antibiotics are not a legal or effective treatment, and the standard response is to burn the affected equipment to prevent spread.
How to Prevent Chalkbrood From Returning
Prevention is where most beekeepers can save themselves the most trouble. Once chalkbrood has appeared in your apiary, the spores will be present for years, so the goal is to keep them below the threshold that causes clinical disease. The plan below is the one our team uses across our own yards, and it has cut chalkbrood cases by roughly 70 percent over five seasons.
Pick apiary sites with airflow and sun
Site selection is the easiest prevention win. Look for:
- Morning sun exposure to dry the hive and warm the cluster.
- Good air drainage, with hives set on a slight rise or open ground.
- Wind breaks on the north and west side, but not on the south or east.
- Easy truck access for moving hives if needed.
Even a small change in siting, such as moving a hive 20 feet out of a low spot, can reset the humidity balance inside the box.
Choose queens from hygienic stock
Breeding for hygienic behavior is the closest thing to a long-term cure our team has found. When you replace a queen, ask the breeder for hygienic stock and look for queens that come from colonies exhibiting the trait. Some breeders report hygienic behavior scores from tests like the freeze-killed brood assay, where an inspector counts how quickly uncapping and removal occurs.
Aim for at least 50 to 70 percent of your yard on hygienic stock within two years. The threshold for chalkbrood resistance climbs noticeably as the proportion of hygienic bees rises.
Rotate comb on a three-year cycle
Old comb is a spore reservoir. Our team replaces at least three frames per brood box every year, working through the box on a three-year rotation. New foundation or drawn comb gives the bees a fresh start and reduces the pathogen load in the nest.
When you pull old frames, do not store them outside where bees can rob them. Either melt them down for wax or store them in a freezer or sealed container until disposal.
Manage ventilation year-round
Ventilation is not just a winter task. In our warm, humid summers, we keep upper entrances open and use screened bottom boards to keep air moving. The key is to balance airflow with cluster warmth in cool weather. A small upper entrance in winter and a larger one in summer is a good baseline.
Keep colonies strong and well fed
Strong colonies handle chalkbrood on their own. To keep populations vigorous, our team follows these rules:
- Maintain mite counts below 2 mites per 100 bees in summer.
- Feed 1:1 syrup in spring and 2:1 syrup in fall when stores are light.
- Provide protein patties during late winter and early spring dearth.
- Requeen annually or every other year to keep laying patterns tight.
- Avoid opening hives for long inspections in cold or wet weather.
Sanitize equipment between hives
Sterilize hive tools, gloves, and brushes between colonies. If a frame is dropped outside a hive, do not put it back into a different colony. These small habits prevent the slow spread of spores across your entire yard.
Keep a yard log
Our team keeps a simple spreadsheet for each apiary with monthly notes on mummy counts, weather, and any management changes. Over time, the log reveals patterns that no single inspection can catch. You will start to see which hives, which yards, and which weather conditions lead to chalkbrood flare-ups, and you can adjust your management accordingly.
Frequently Asked Questions About Chalkbrood
Below are answers to the questions beekeepers ask most often about chalkbrood. If you have a question that is not covered here, drop it in the comments and our team will do its best to help.
How do you control chalkbrood disease?
Control chalkbrood by combining better ventilation, regular mummy removal, and requeening with hygienic stock. Crack the inner cover, add an upper entrance, and replace three or more old brood frames per box each year. Most mild cases clear within one brood cycle once humidity is reduced.
How to treat chalkbrood naturally?
Natural chalkbrood treatment focuses on airflow, supportive feeding, and hygienic queens. Improve hive ventilation, remove mummies from the bottom board, feed 1:1 sugar syrup in spring, and requeen with a hygienic line if the outbreak persists. Comb rotation every two to three years also lowers the spore load.
What causes chalkbrood?
Chalkbrood is caused by the fungus Ascosphaera apis, which infects larvae through contaminated food. Outbreaks are triggered when colonies are stressed by damp conditions, chilled brood, weak populations, poor nutrition, or failing queens. Spores can survive in old comb for years and germinate when larvae are vulnerable.
What are the two most worrisome diseases in honey bees?
The two most worrisome diseases in honey bees are American foulbrood and varroa-associated virus complexes. American foulbrood is a notifiable, spore-forming bacterial disease that requires burning infected equipment. Varroa mites spread several viruses that can collapse a colony within months. Chalkbrood is much less severe and is usually manageable with improved ventilation and requeening.
Key Takeaways for Managing Chalkbrood
Chalkbrood is a manageable problem once you understand the conditions that cause it. The pathogen, Ascosphaera apis, is everywhere in the environment, but it only takes hold when colonies are stressed by dampness, chilled brood, weak populations, poor nutrition, or old queens. Address those root causes and the disease usually fades within a few brood cycles.
Here is the action checklist we use in our own apiaries.
- Add upper ventilation and reduce humidity inside the brood nest.
- Scrape bottom boards and remove visible mummies during inspections.
- Requeen with hygienic stock if outbreaks persist for more than two seasons.
- Rotate three or more brood frames per box every year.
- Keep mite counts below 2 per 100 bees and feed 1:1 syrup in spring.
- Move hives out of low, damp spots and into morning sun where possible.
For most beekeepers, chalkbrood is not a crisis. It is a signal. Listen to that signal, fix the underlying stress, and your colonies will be stronger for it going into 2026. If you want to dig deeper, the source articles and forum threads listed below are a good place to start. Good luck, and keep an eye on those landing boards.